# istio
# 介绍
流量
安全
可观测性
扩展性
# 安装istio
#指定版本安装(1.22.0)
curl -L https://istio.io/downloadIstio | ISTIO_VERSION=1.22.0 TARGET_ARCH=x86_64 sh -
或
#默认安装istio最新版
curl -L https://istio.io/downloadIstio | sh -

#配置istioctl到path
export PATH=$PATH:/root/istio-1.22.0/bin


#安装
istioctl install --set profile=demo -y
#创建istio的命名空间(meteor)
kubectl create ns meteor
#给命名空间添加标签,部署应用时自动注入 Envoy 边车代理   default修改为对应的命名空间(meteor)
kubectl label namespace default istio-injection=enabled
修改为:
kubectl label namespace meteor istio-injection=enabled
# 部署Bookinfo
# 在/root/istio-1.22.0目录执行
vim samples/bookinfo/platform/kube/bookinfo.yaml

# 部署bookinfo.yaml,-n meteor 指定命名空间为meteor
kubectl apply -f samples/bookinfo/platform/kube/bookinfo.yaml -n meteor

#查看pod
kubectl get pod -n meteor

#进入容器(默认命名空间删除-n meteor)
kubectl exec -n meteor "$(kubectl get -n meteor pod -l app=ratings -o jsonpath='{.items[0].metadata.name}')" -c ratings -- curl -sS productpage:9080/productpage | grep -o "<title>.*</title>"

#查看service和pod
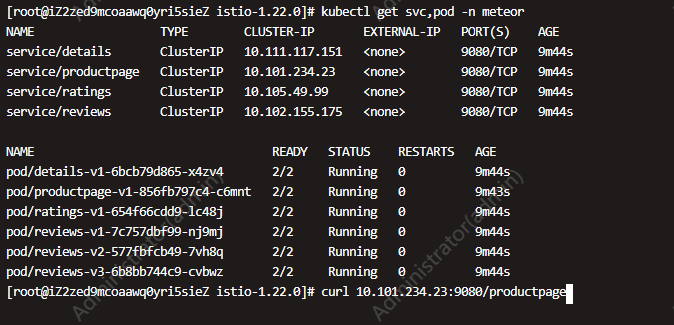
kubectl get svc,pod -n meteor

#控制台访问
curl 10.101.234.23:9080/productpage

# 公网访问
# 查看service
kubectl get service -n meteor

#将type:ClusterIP 修改为 NodePort
kubectl edit svc productpage -n meteor

# 在/root/istio-1.22.0目录执行(配置域名)
vim samples/bookinfo/networking/bookinfo-gateway.yaml

# 部署bookinfo.yaml,-n meteor 指定命名空间为meteor
kubectl apply -f samples/bookinfo/networking/bookinfo-gateway.yaml -n meteor
# 删除
kubectl delete -f samples/bookinfo/networking/bookinfo-gateway.yaml -n meteor

#查看istio的外网ip
kubectl get svc -n istio-system

#浏览器访问
http://172.17.110.249:32310/productpage
# 仪表板(Kiali)
#安装Kiali和其他插件
kubectl apply -f samples/addons

#查看
kubectl get svc  -n istio-system

#查看所有信息
kubectl get all -n istio-system

#将type:ClusterIP 修改为 NodePort
kubectl edit service/kiali -n istio-system

#查看开放的端口
kubectl get all -n istio-system

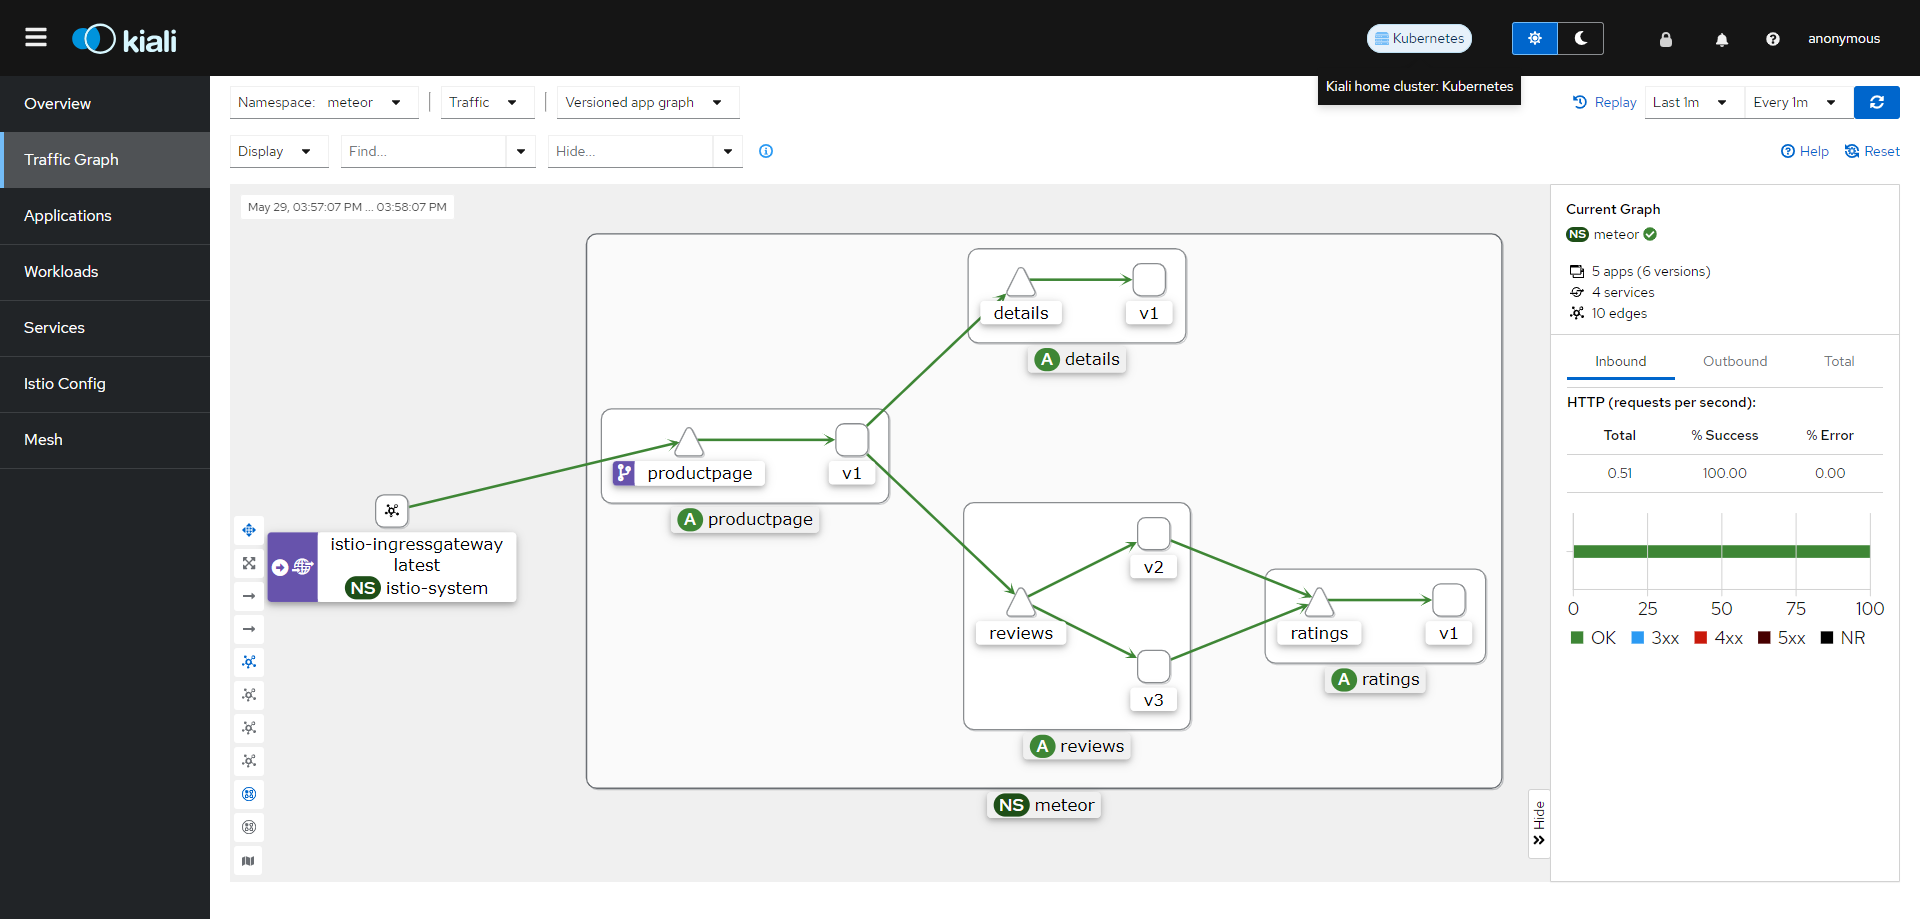
#访问Kiali后台
http://172.17.110.249:30870
# 灰度发布
1 kiali后台Services,选择要灰度发布的服务
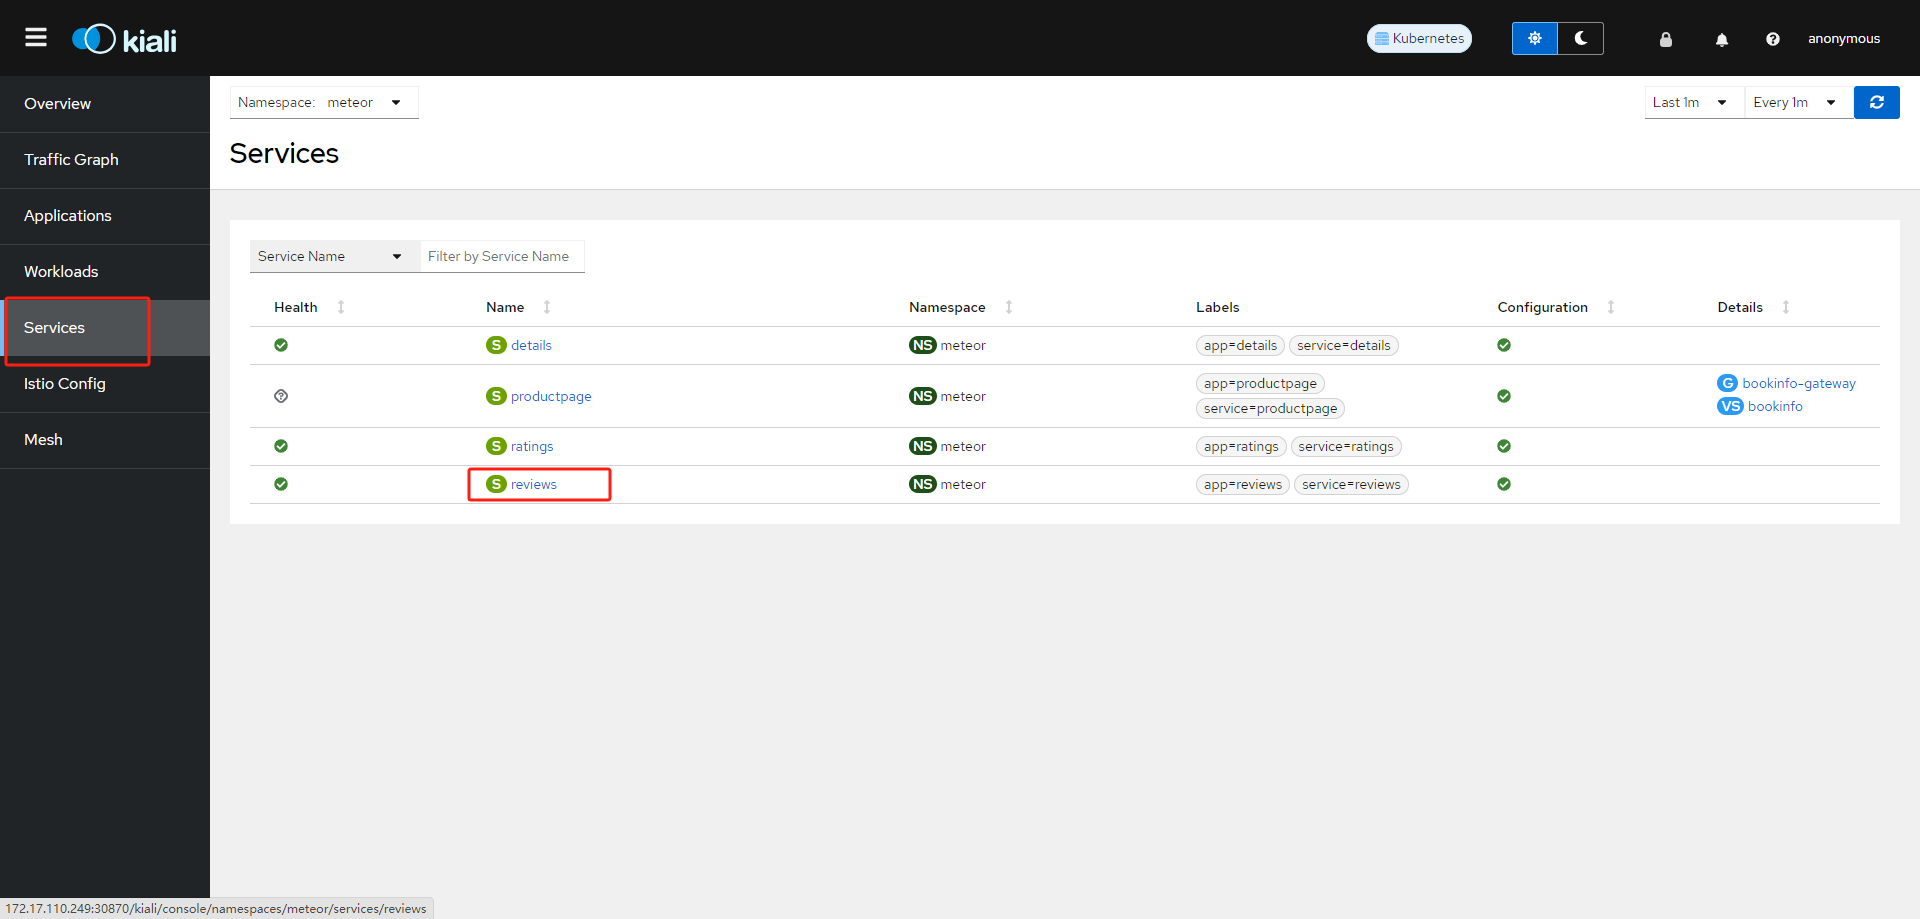
选择 Traffic Shifting
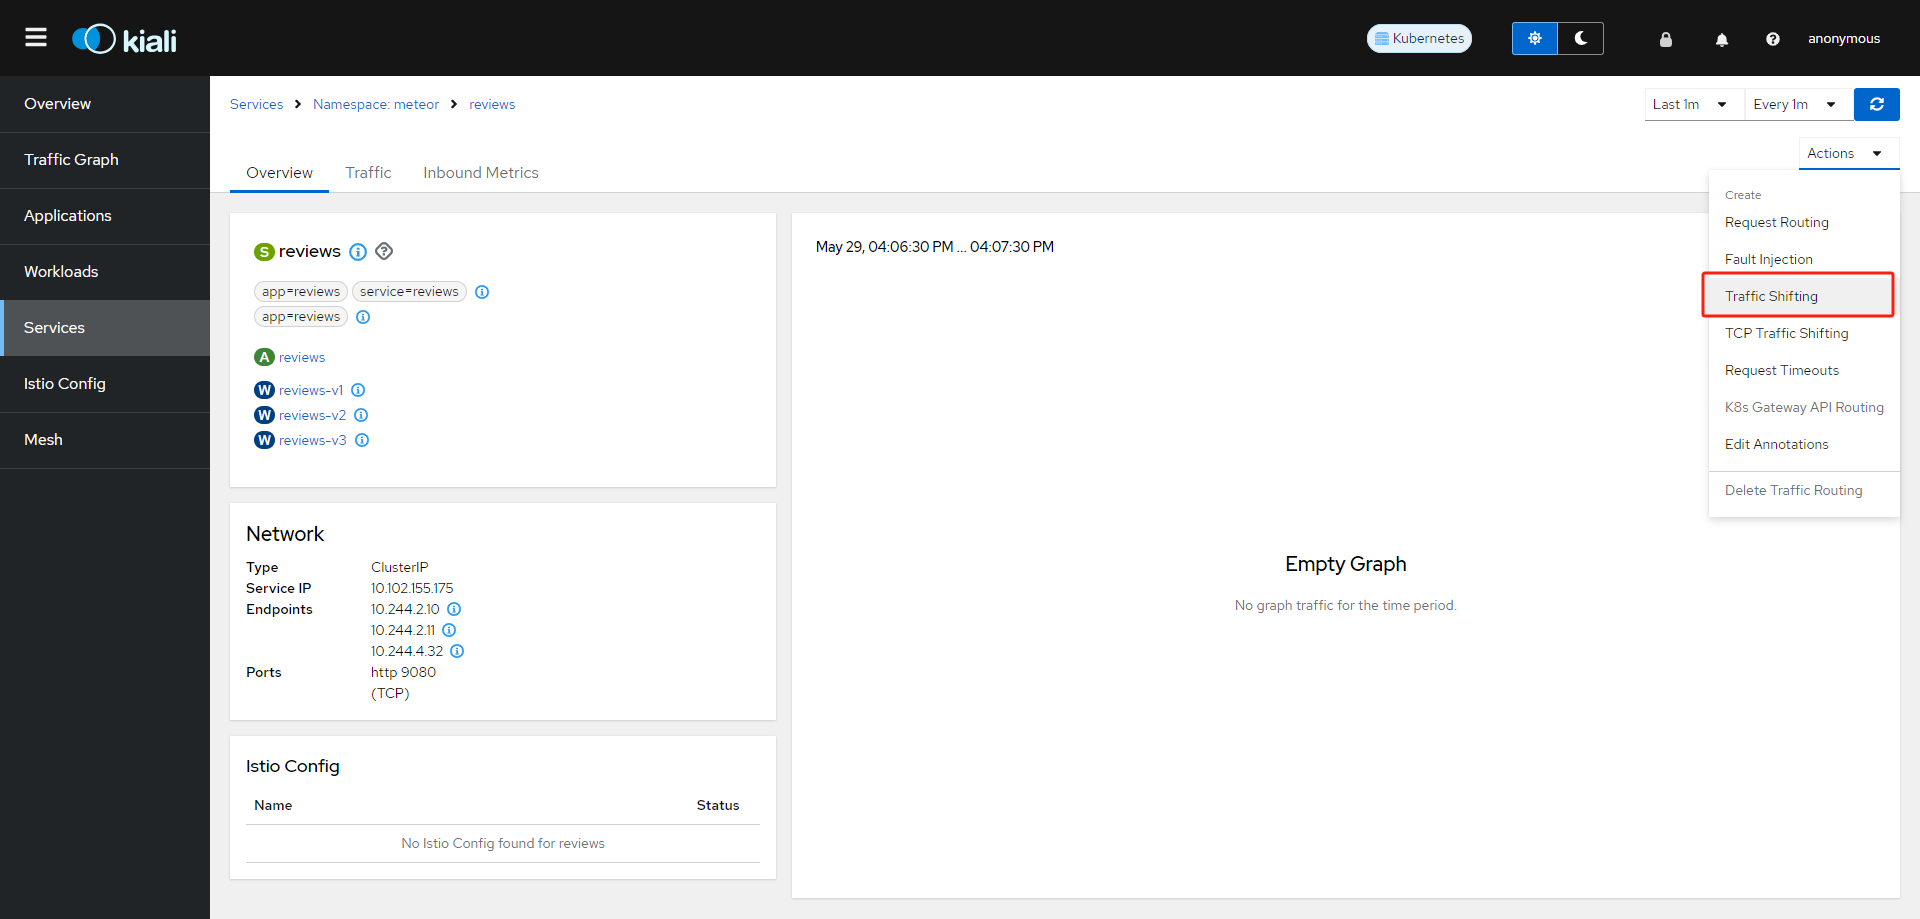
设置流量比例
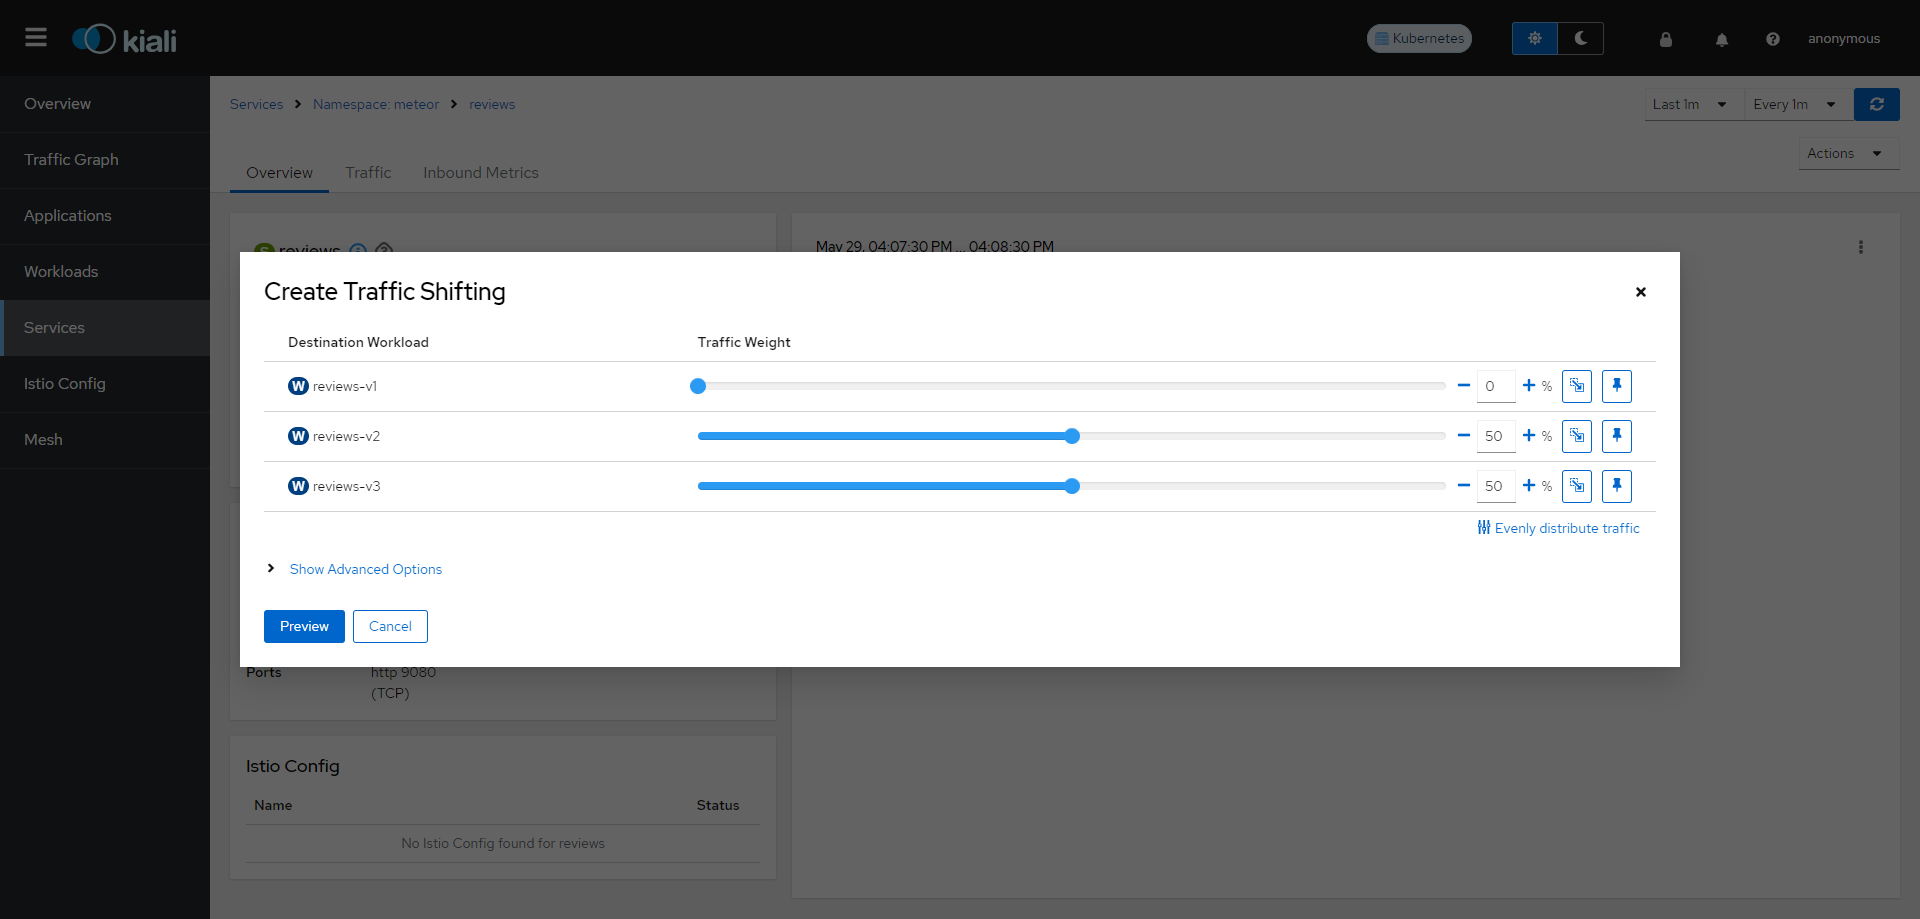
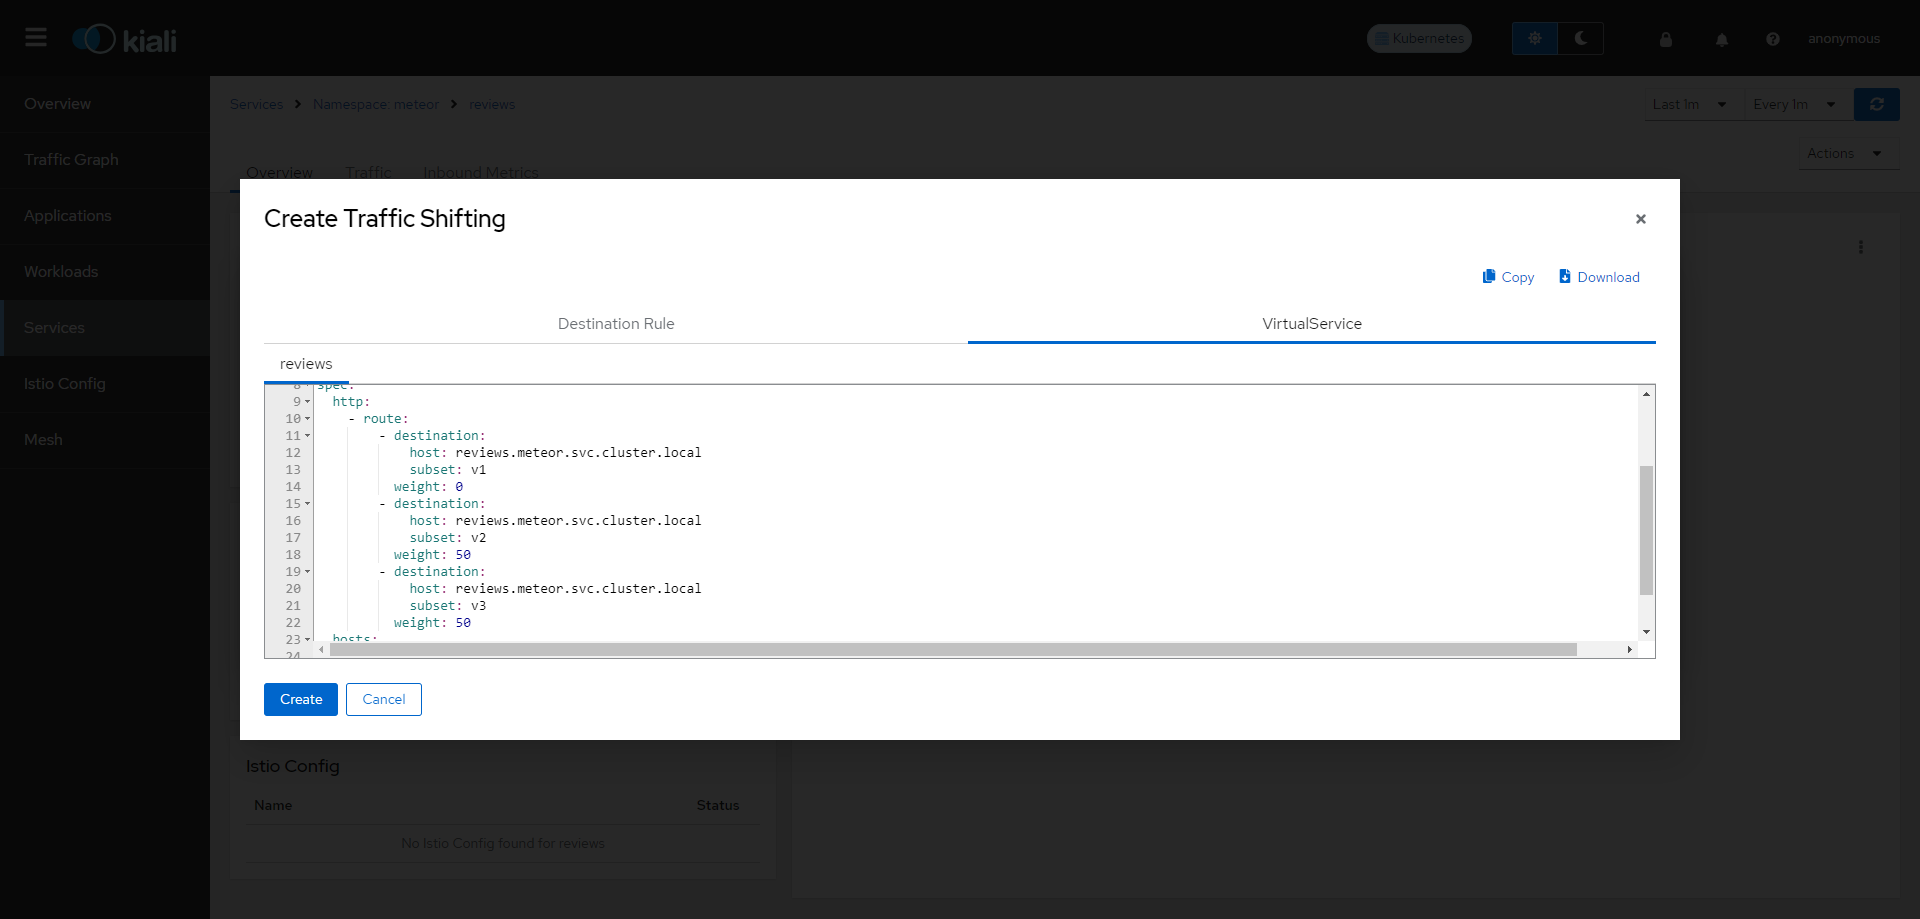
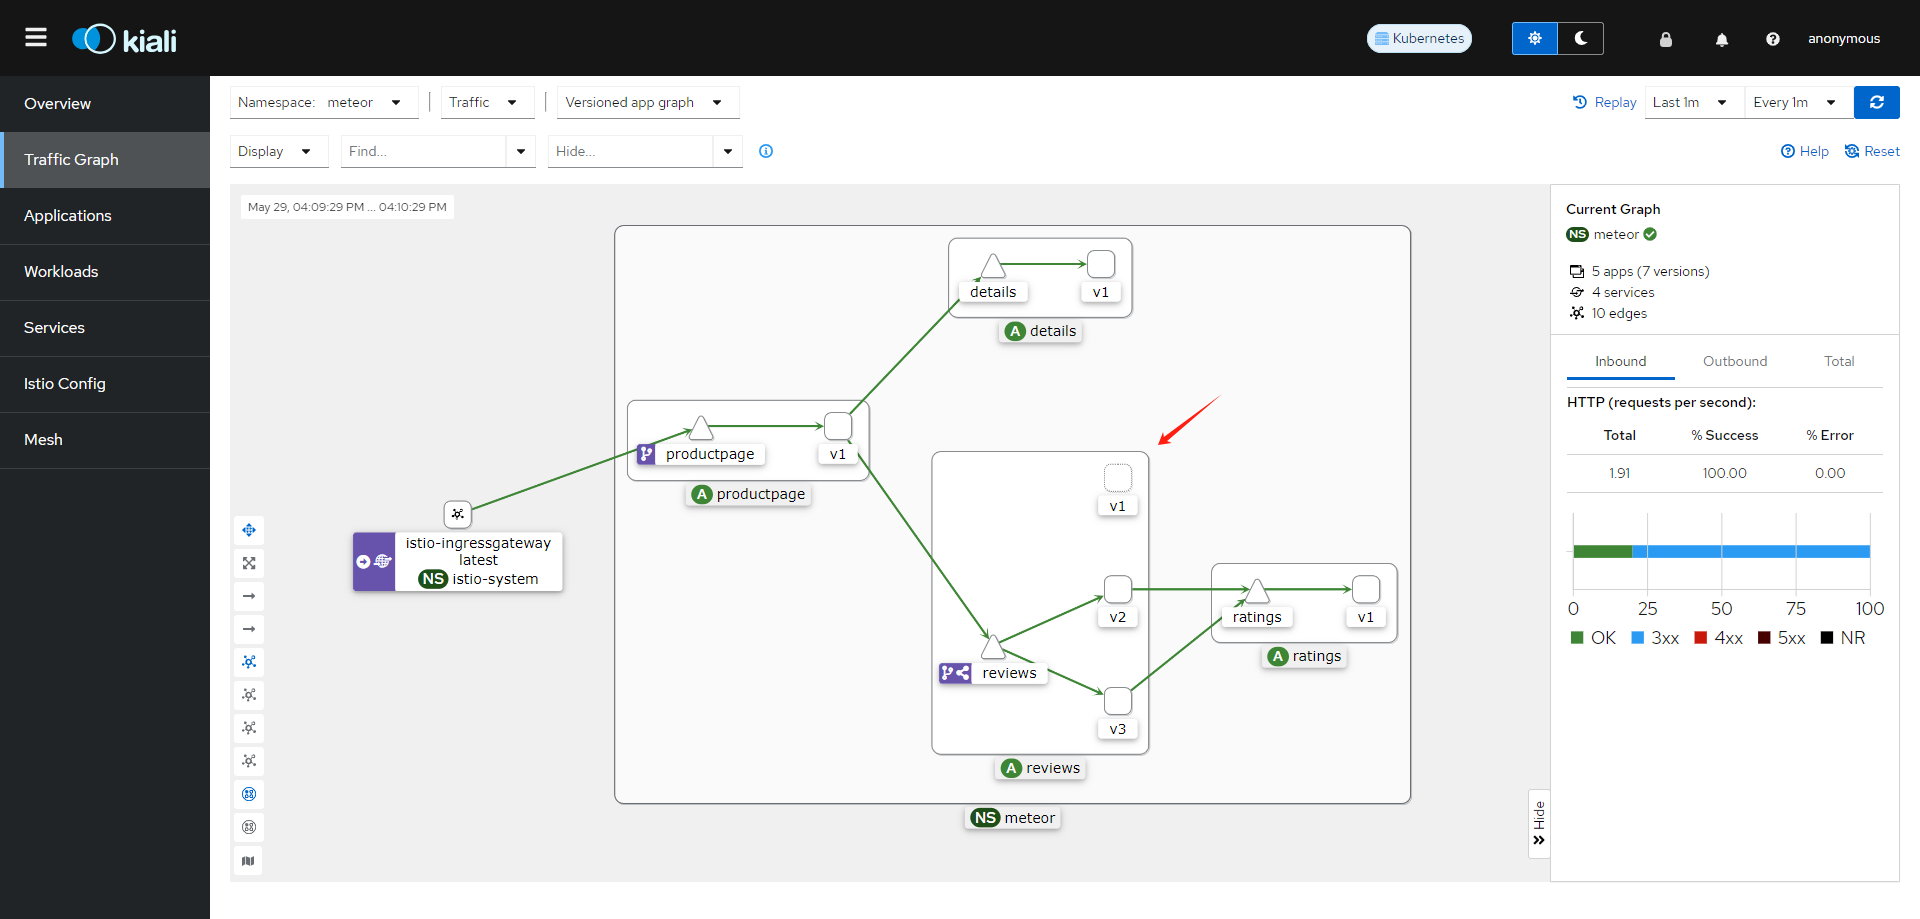
可以看到v1已经没有流量了
# demo演示
# 创建deployment
#进入目录
cd /root/istio-1.22.0/samples
#编辑脚本    改命名空间
vim tomcatdeploy.yaml

apiVersion: apps/v1
kind: Deployment
metadata:
  creationTimestamp: null
  labels:
    app: tomcat
  name: tomcat
  namespace: meteor
spec:
  replicas: 1
  selector:
    matchLabels:
      app: tomcat
  strategy: {}
  template:
    metadata:
      creationTimestamp: null
      labels:
        app: tomcat
    spec:
      containers:
      - image: tomcat:latest
        imagePullPolicy: IfNotPresent
        name: tomcat
        ports:
        - containerPort: 8080
        resources: {}

#启动
kubectl apply -f tomcatdeploy.yaml


#查看service和pod
kubectl get svc,pod -n meteor

kubectl describe pod tomcat-76bf946746-j6znl -n meteor
#查看ip
kubectl get svc,pod -n istio-system
# 创建service
#编辑脚本    改命名空间
vim tomcatsvc.yaml

apiVersion: v1
kind: Service
metadata:
  creationTimestamp: null
  labels:
    app: tomcat
  name: tomcat
  namespace: meteor
spec:
  ports:
  - port: 80
    name: tcp
    protocol: TCP
    targetPort: 8080
  selector:
    app: tomcat
status:
  loadBalancer:  {}

#启动
kubectl apply -f tomcatsvc.yaml
#删除
kubectl delete -f tomcatsvc.yaml
#查看service和pod
kubectl get svc,pod -n meteor

#通过查看显示的ip,测试访问
curl 10.98.181.209
# 创建gateway
#编辑脚本
vim ingressgateway80.yaml

apiVersion: networking.istio.io/v1alpha3
kind: Gateway
metadata:
  name: ingressgateway80
spec:
  selector:
    istio: ingressgateway
  servers:
  - port:
      number: 80
      name: http
      protocol: HTTP
    hosts:
    - "*"

#启动
kubectl apply -f ingressgateway80.yaml -n meteor
#删除
kubectl delete -f ingressgateway80.yaml -n meteor

#查看所有网关
kubectl get gateways --all-namespaces
#查看网关详情
kubectl describe gateway ingressgateway80 -n meteor
# 创建virtualservice
网关不知道路由到哪个服务,需要virtualservice
#编辑脚本   改命名空间
vim tomcat-virtualservice.yaml

apiVersion: networking.istio.io/v1alpha3
kind: VirtualService
metadata:
  name: tomcat-virtualservice
spec:
  hosts:
  - "*"
  gateways:
  - ingressgateway80
  http:
  - match:
    route:
    - destination:
        host: tomcat
        port:
          number: 80


#启动
kubectl apply -f tomcat-virtualservice.yaml -n meteor
#删除
kubectl delete -f tomcat-virtualservice.yaml -n meteor


#查看所有virtualservice
kubectl get virtualservice --all-namespaces
#查看virtualservice详情
kubectl describe virtualservice tomcat-virtualservice -n meteor

#查看service和pod
kubectl get svc,pod -n meteor
#查看ip
kubectl get svc,pod -n istio-system

book                 productpage
curl 10.107.239.240:9080/productpage
tomcat               tomcat
curl 10.104.186.227

# tomcat-gateway.yaml,-n meteor 指定命名空间为meteor
kubectl apply -f samples/bookinfo/networking/tomcat-gateway.yaml -n meteor
kubectl delete -f samples/bookinfo/networking/tomcat-gateway.yaml -n meteor


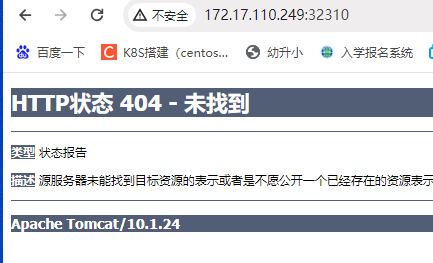
# 通过网关ip测试
http://172.17.110.249:32310/
# virtualservice参数
match
重定向
重写
重试
http流量镜像(把生产流量指向指定service)
http故障注入(延迟或终止)
http跨域
DestinationRule(目标规则)
# istio集成组件
Prometheus,Grafana,zipkin
在安装kiali时已安装,脚本路径(samples/addons),将type:ClusterIP 修改为 NodePort后即可使用
# APISIX(云原生网关)
# 介绍
优势:
无数据库依赖,通过etcd,感知毫秒级别
热加载
高性能IP匹配算法
精细化路由
# 安装etcd
- 参考博客 https://zhuanlan.zhihu.com/p/697712128
# 查看是否安装
yum list installed | grep etcd

#下载etcd
wget https://github.com/etcd-io/etcd/releases/download/v3.4.14/etcd-v3.4.14-linux-amd64.tar.gz
#解压安装包
tar -zxvf etcd-v3.4.14-linux-amd64.tar.gz
#移动到etcd文件夹
mv etcd-v3.4.14-linux-amd64 etcd
#复制到系统路径
sudo cp etcd/etcd /usr/local/bin/
sudo cp etcd/etcdctl /usr/local/bin/
#设置v3版本
export ETCDCTL_API=3
#查看版本
etcd --version
etcdctl version


sudo systemctl daemon-reload

sudo systemctl status etcd
sudo systemctl stop etcd
sudo systemctl start etcd

#启动
cd etcd

sudo ./etcd &

sudo ./etcd --name etcd0 \
--listen-client-urls http://0.0.0.0:2379 \
--advertise-client-urls http://172.17.110.249:2379,http://172.17.110.249:2379 &


sudo ss -tulnp | grep 2379

sudo kill -9


# 卸载
#停止etcd服务
sudo systemctl stop etcd
#禁用etcd服务,使其不再随系统启动
sudo systemctl disable etcd
#卸载yum安装包
sudo yum remove etcd
#删除二进制文件
sudo rm /usr/local/bin/etcd
sudo rm /usr/local/bin/etcdctl
#删除数据和日志目录
sudo rm -rf /var/lib/etcd/
sudo rm -rf /var/log/etcd/
#检查ETCD版本
etcd --version

curl etcd:2379/version
curl 127.0.0.1:2379/version
curl 172.17.110.249:2379/version
# 安装apisix
- 博客 https://blog.csdn.net/yixiao120212/article/details/136741258
# 目录
cd /root/apisix/apisix-docker-master

#创建apisix_conf
apisix_conf/config.yaml

apisix:
  ssl:
    enable: true
    listen:                                       # APISIX listening port for HTTPS traffic.
      - port: 9443
        enable_http2: true
      # - ip: 127.0.0.3                           # If not set, default to `0.0.0.0`.
      #   port: 9445
      #   enable_http2: true
    # ssl_trusted_certificate: /path/to/ca-cert   # Set the path to CA certificates used to verify client
                                                  # certificates in the PEM format.
    ssl_protocols: TLSv1.2 TLSv1.3                # TLS versions supported.
deployment:
  role: traditional
  role_traditional:
    config_provider: etcd
  etcd:
    host:
      - http://172.17.110.249:2379
  admin:
    admin_key:
      - name: admin
        key: edd1c9f034335f136f87ad84b625c8f1  # using fixed API token has security risk, please update it when you deploy to production environment
        role: admin

#创建apisix_dashboard/config.yaml

#
# Licensed to the Apache Software Foundation (ASF) under one or more
# contributor license agreements.  See the NOTICE file distributed with
# this work for additional information regarding copyright ownership.
# The ASF licenses this file to You under the Apache License, Version 2.0
# (the "License"); you may not use this file except in compliance with
# the License.  You may obtain a copy of the License at
#
#     http://www.apache.org/licenses/LICENSE-2.0
#
# Unless required by applicable law or agreed to in writing, software
# distributed under the License is distributed on an "AS IS" BASIS,
# WITHOUT WARRANTIES OR CONDITIONS OF ANY KIND, either express or implied.
# See the License for the specific language governing permissions and
# limitations under the License.
#

# yamllint disable rule:comments-indentation
conf:
  listen:
    # host: 127.0.0.1     # the address on which the `Manager API` should listen.
                          # The default value is 0.0.0.0, if want to specify, please enable it.
                          # This value accepts IPv4, IPv6, and hostname.
    port: 9000            # The port on which the `Manager API` should listen.

  # ssl:
  #   host: 127.0.0.1     # the address on which the `Manager API` should listen for HTTPS.
                          # The default value is 0.0.0.0, if want to specify, please enable it.
  #   port: 9001            # The port on which the `Manager API` should listen for HTTPS.
  #   cert: "/tmp/cert/example.crt" # Path of your SSL cert.
  #   key:  "/tmp/cert/example.key"  # Path of your SSL key.

  allow_list:             # If we don't set any IP list, then any IP access is allowed by default.
    - 127.0.0.1           # The rules are checked in sequence until the first match is found.
    - ::1
    - 0.0.0.0/0
    - etcd                 # In this example, access is allowed only for IPv4 network 127.0.0.1, and for IPv6 network ::1.
                          # It also support CIDR like 192.168.1.0/24 and 2001:0db8::/32
  etcd:
    endpoints:            # supports defining multiple etcd host addresses for an etcd cluster
      - 172.17.110.249:2379
                          # yamllint disable rule:comments-indentation
                          # etcd basic auth info
    # username: "root"    # ignore etcd username if not enable etcd auth
    # password: "123456"  # ignore etcd password if not enable etcd auth
    mtls:
      key_file: ""          # Path of your self-signed client side key
      cert_file: ""         # Path of your self-signed client side cert
      ca_file: ""           # Path of your self-signed ca cert, the CA is used to sign callers' certificates
    # prefix: /apisix       # apisix config's prefix in etcd, /apisix by default
  log:
    error_log:
      level: warn       # supports levels, lower to higher: debug, info, warn, error, panic, fatal
      file_path:
        logs/error.log  # supports relative path, absolute path, standard output
                        # such as: logs/error.log, /tmp/logs/error.log, /dev/stdout, /dev/stderr
                        # such as absolute path on Windows: winfile:///C:\error.log
    access_log:
      file_path:
        logs/access.log  # supports relative path, absolute path, standard output
                        # such as: logs/access.log, /tmp/logs/access.log, /dev/stdout, /dev/stderr
                        # such as absolute path on Windows: winfile:///C:\access.log
                        # log example: 2020-12-09T16:38:09.039+0800     INFO    filter/logging.go:46    /apisix/admin/routes/r1 {"status": 401, "host": "127.0.0.1:9000", "query": "asdfsafd=adf&a=a", "requestId": "3d50ecb8-758c-46d1-af5b-cd9d1c820156", "latency": 0, "remoteIP": "127.0.0.1", "method": "PUT", "errs": []}
  max_cpu: 0             # supports tweaking with the number of OS threads are going to be used for parallelism. Default value: 0 [will use max number of available cpu cores considering hyperthreading (if any)]. Ifthe value is negative, is will not touch the existing parallelism profile.
  # security:
  #   access_control_allow_origin: "http://httpbin.org"
  #   access_control_allow_credentials: true          # support using custom cors configration
  #   access_control_allow_headers: "Authorization"
  #   access_control-allow_methods: "*"
  #   x_frame_options: "deny"
  #   content_security_policy: "default-src 'self'; script-src 'self' 'unsafe-eval' 'unsafe-inline'; style-src 'self' 'unsafe-inline'; img-src 'self' data:; frame-src xx.xx.xx.xx:3000"  # You can set frame-src to provide content for your grafana panel.

authentication:
  secret:
    secret              # secret for jwt token generation.
                        # NOTE: Highly recommended to modify this value to protect `manager api`.
                        # if it's default value, when `manager api` start, it will generate a random string to replace it.
  expire_time: 3600     # jwt token expire time, in second
  users:                # yamllint enable rule:comments-indentation
    - username: admin   # username and password for login `manager api`
      password: admin

oidc:
  enabled: false
  expire_time: 3600
  client_id: dashboard
  client_secret: dashboard
  auth_url: http://172.17.0.1:8080/auth/realms/master/protocol/openid-connect/auth
  token_url: http://172.17.0.1:8080/auth/realms/master/protocol/openid-connect/token
  user_info_url: http://172.17.0.1:8080/auth/realms/master/protocol/openid-connect/userinfo
  redirect_url: http://127.0.0.1:9000/apisix/admin/oidc/callback
  scope: openid

plugins:
  - api-breaker
  - authz-casbin
  - authz-casdoor
  - authz-keycloak
  - aws-lambda
  - azure-functions
  - basic-auth
  # - batch-requests
  - clickhouse-logger
  - client-control
  - consumer-restriction
  - cors
  - csrf
  - datadog
  # - dubbo-proxy
  - echo
  - error-log-logger
  # - example-plugin
  - ext-plugin-post-req
  - ext-plugin-post-resp
  - ext-plugin-pre-req
  - fault-injection
  - file-logger
  - forward-auth
  - google-cloud-logging
  - grpc-transcode
  - grpc-web
  - gzip
  - hmac-auth
  - http-logger
  - ip-restriction
  - jwt-auth
  - kafka-logger
  - kafka-proxy
  - key-auth
  - ldap-auth
  - limit-conn
  - limit-count
  - limit-req
  - loggly
  # - log-rotate
  - mocking
  # - node-status
  - opa
  - openid-connect
  - opentelemetry
  - openwhisk
  - prometheus
  - proxy-cache
  - proxy-control
  - proxy-mirror
  - proxy-rewrite
  - public-api
  - real-ip
  - redirect
  - referer-restriction
  - request-id
  - request-validation
  - response-rewrite
  - rocketmq-logger
  - server-info
  - serverless-post-function
  - serverless-pre-function
  - skywalking
  - skywalking-logger
  - sls-logger
  - splunk-hec-logging
  - syslog
  - tcp-logger
  - traffic-split
  - ua-restriction
  - udp-logger
  - uri-blocker
  - wolf-rbac
  - zipkin
  - elasticsearch-logge
  - openfunction
  - tencent-cloud-cls
  - ai
  - cas-auth


#编辑
docker-compose.yaml

version: '3'
services:
  apisix:
    container_name: apisix
    #highlight-next-line
    image: apache/apisix:3.6.0-debian
    restart: always
    ports:
      - 9080:9080
      - 9091:9091
      - 9443:9443
      - 9180:9180
    networks:
      - apisix
    volumes:
      - ./apisix_conf/config.yaml:/usr/local/apisix/conf/config.yaml
#      - ./apisix_log:/usr/local/apisix/logs
  dashboard:
    container_name: dashboard
    image: bitnami/apisix-dashboard
    restart: always
    ports:
      - 9000:9000
    networks:
      - apisix
    depends_on:
#      - etcd
      - apisix
    volumes:
      - ./apisix_dashboard/config.yaml:/opt/bitnami/apisix-dashboard/conf/conf.yaml
networks:
  apisix:

#启动
docker-compose up -d

docker-compose logs

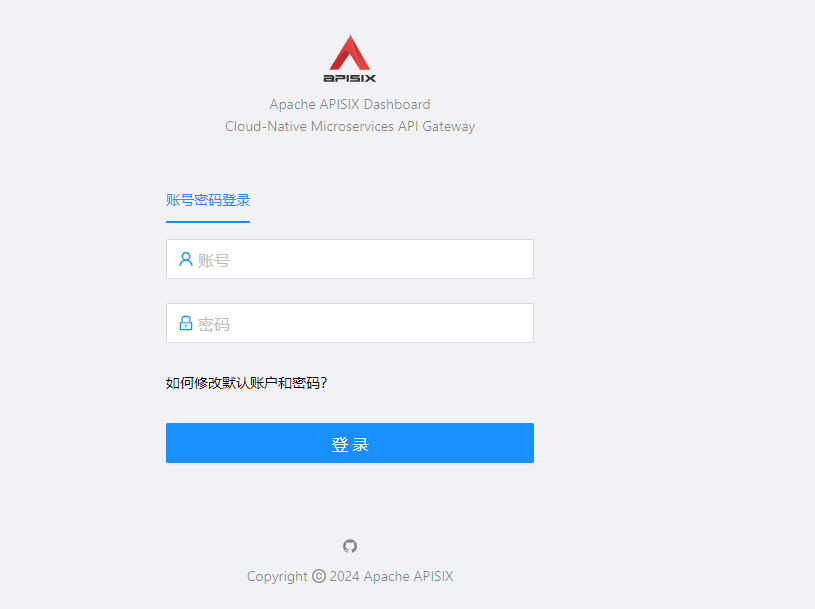
#apisix后台
http://172.17.110.249:9000/
# Admin API
创建路由
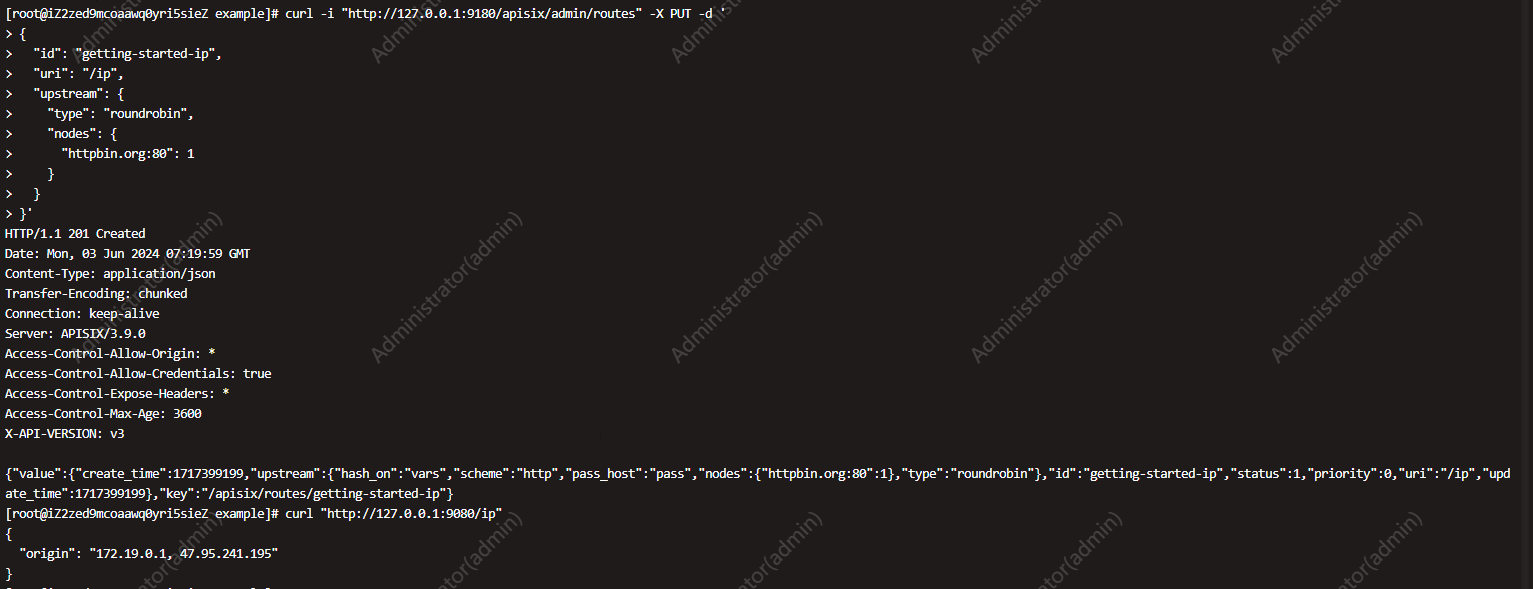
#把请求http://127.0.0.1:9080/ip 转发至 httpbin.org/ip
curl -i "http://127.0.0.1:9180/apisix/admin/routes" -X PUT -d '
{
  "id": "getting-started-ip",
  "uri": "/ip",
  "upstream": {
    "type": "roundrobin",
    "nodes": {
      "httpbin.org:80": 1
    }
  }
}'
#验证
curl "http://127.0.0.1:9080/ip"
负载均衡
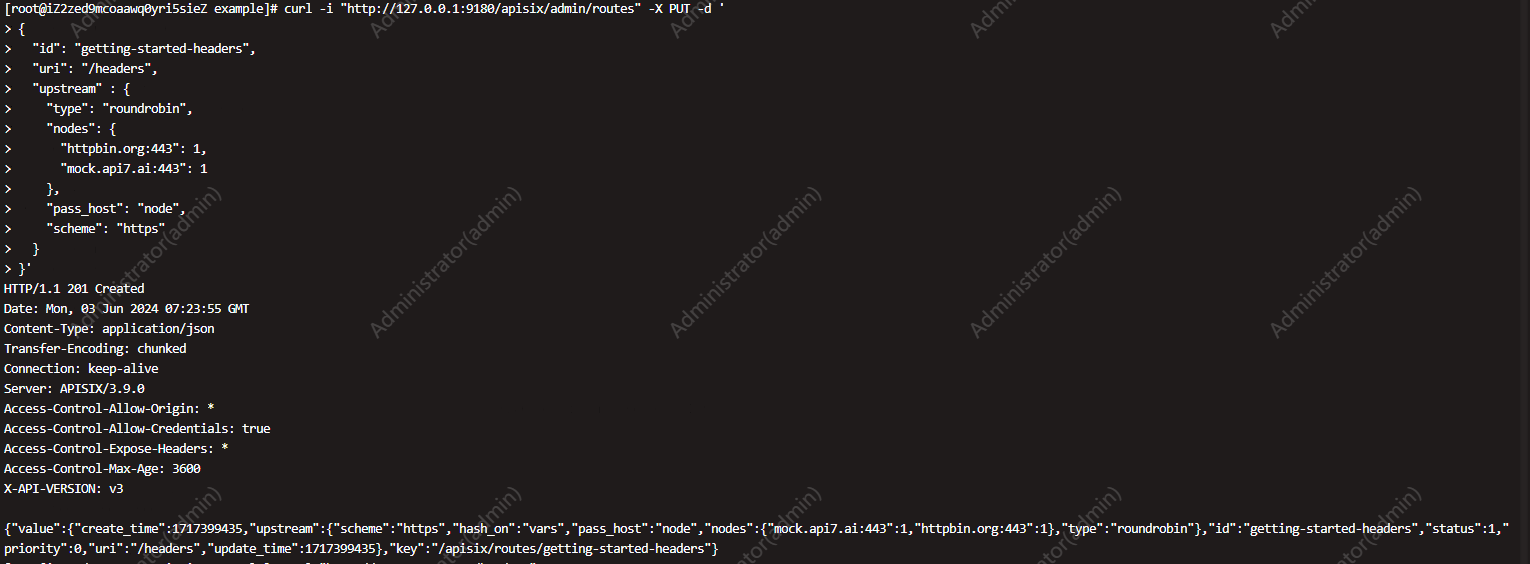
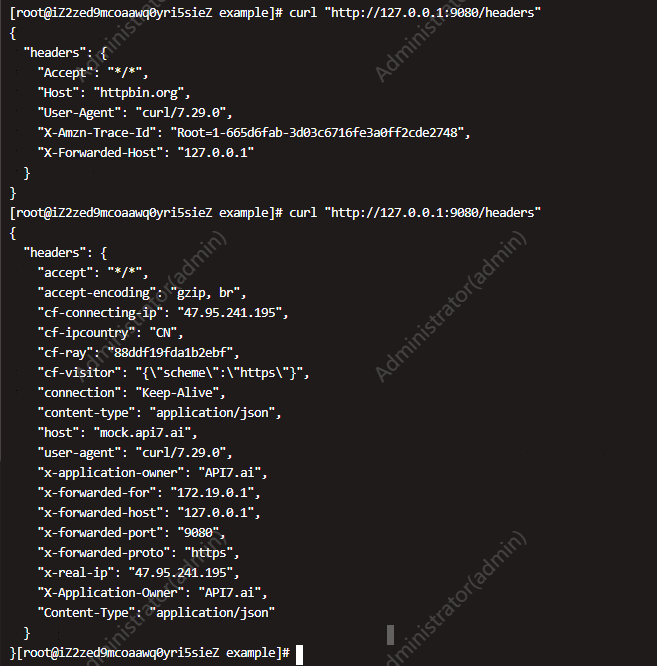
#访问 /headers 将被转发到 httpbin.org 和 mock.api7.ai
curl -i "http://127.0.0.1:9180/apisix/admin/routes" -X PUT -d '
{
  "id": "getting-started-headers",
  "uri": "/headers",
  "upstream" : {
    "type": "roundrobin",
    "nodes": {
      "httpbin.org:443": 1,
      "mock.api7.ai:443": 1
    },
    "pass_host": "node",
    "scheme": "https"
  }
}'
#验证
curl "http://127.0.0.1:9080/headers"
#100 个请求来测试负载均衡的效果
hc=$(seq 100 | xargs -I {} curl "http://127.0.0.1:9080/headers" -sL | grep "httpbin" | wc -l); echo httpbin.org: $hc, mock.api7.ai: $((100 - $hc))

# Dashboard使用
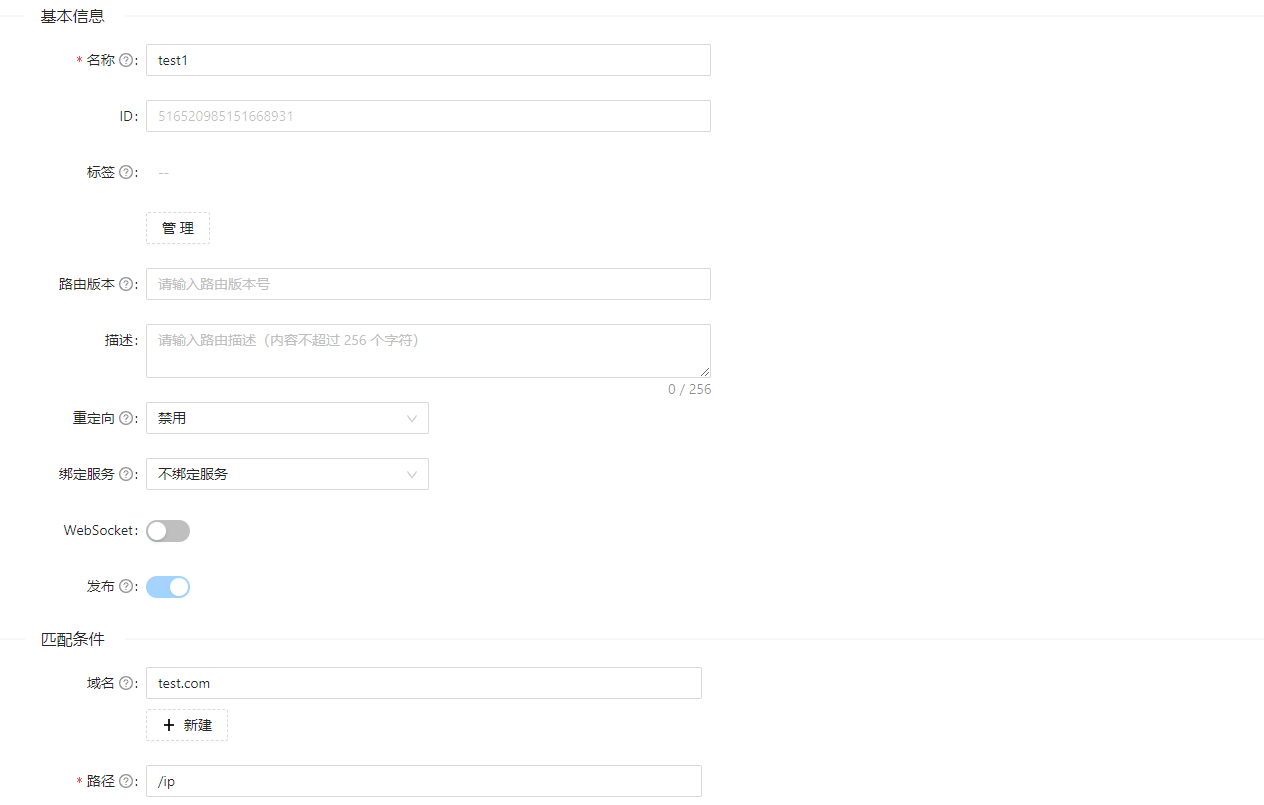
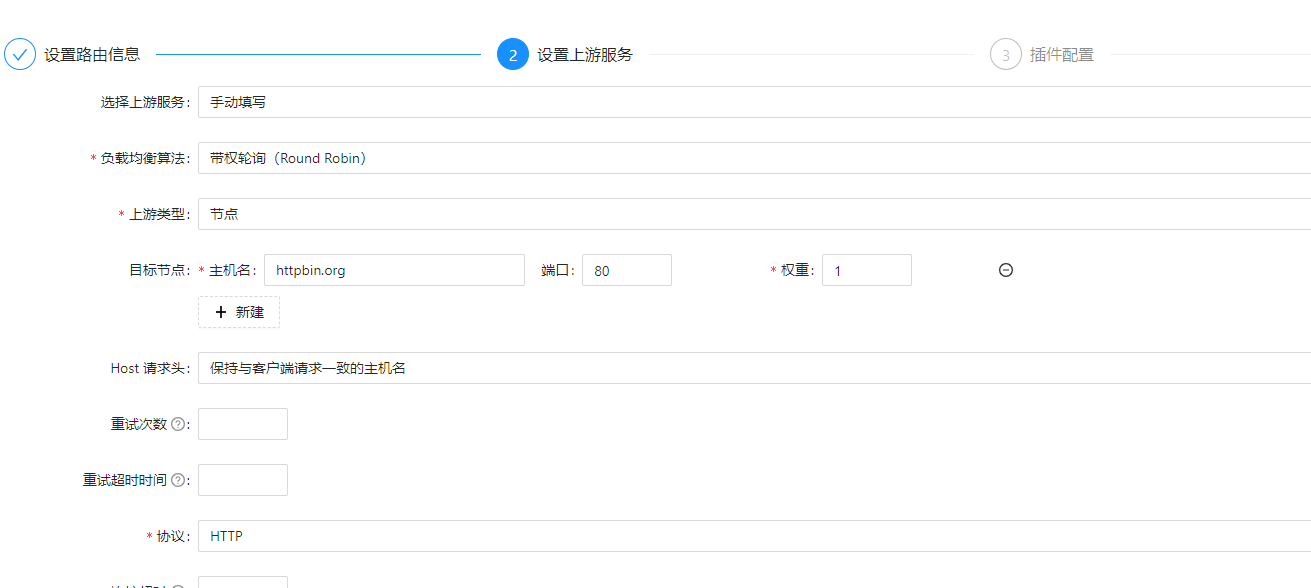
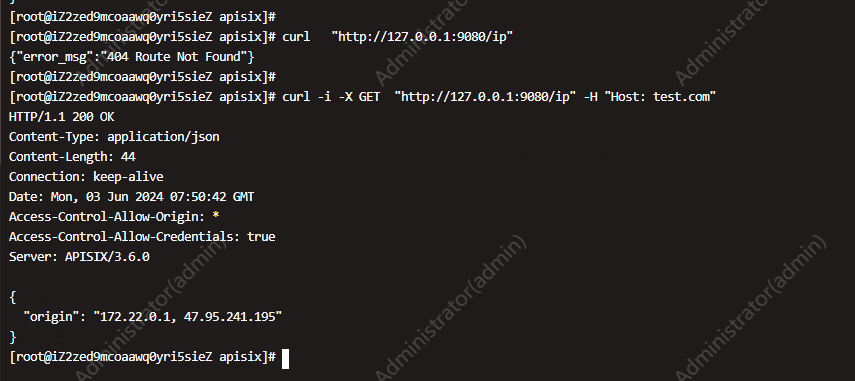
指定域名访问
#
curl "http://127.0.0.1:9080/ip"
#
curl "http://127.0.0.1:9080/ip" -H "Host: test.com"
# 整合Nacos
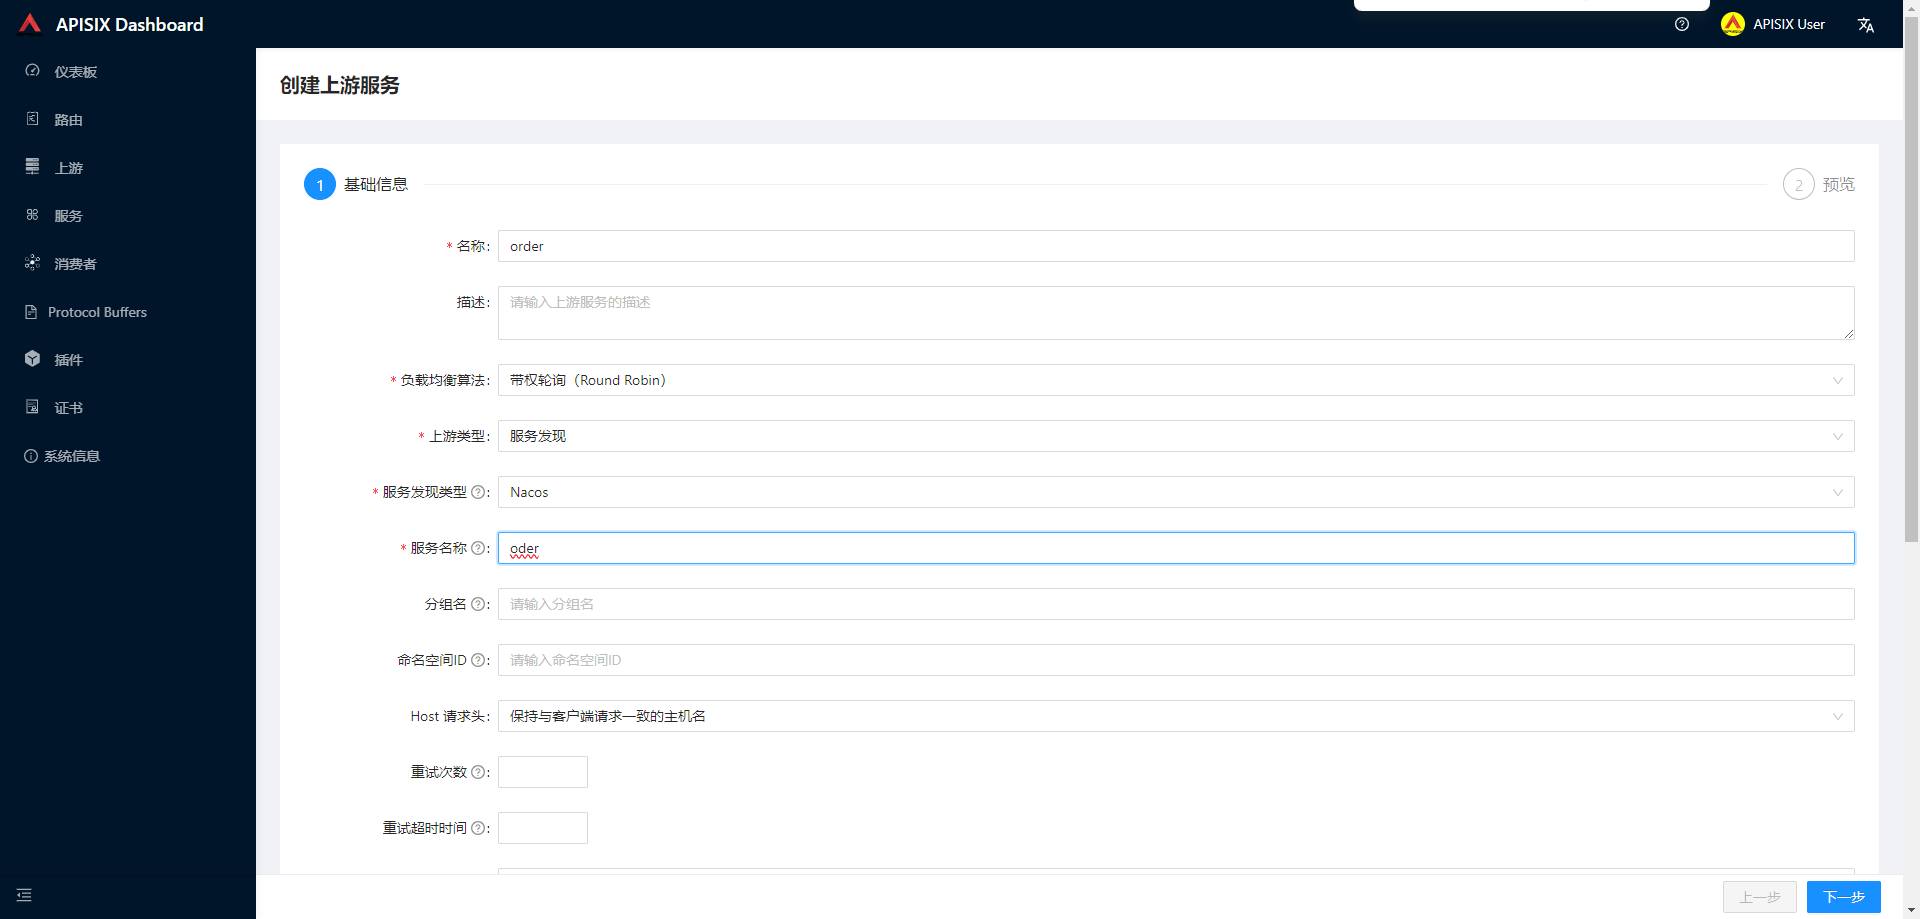
apisix的config.yaml添加nacos的ip,上游列表创建服务
#config.yaml添加
discovery:
  nacos:
    host:
      - "http://nacos:nacos@localhost:8848"
    fetch_interval: 30    # default 30 sec
    weight: 100           # default 100
    timeout:
      connect: 2000       # default 2000 ms
      send: 2000          # default 2000 ms
      read: 5000          # default 5000 ms
# 整合SkyWalking
# 问题总结
# 1通过gateway和virtualservice无法访问服务
将type:ClusterIP 修改为 NodePort后测试gateway可以正常访问,又改回ClusterIP,恢复正常
linkerd →